

We’ve probably all heard it by now. Metadata is data about data. It can be applied to any file. It doesn’t matter if it’s a photo, book, video, document, PDF, animation, etc. Something you may not have heard about it, is that metadata can be quite revealing. The focus of this article will be on digital metadata associated with photos.
Photo Metadata
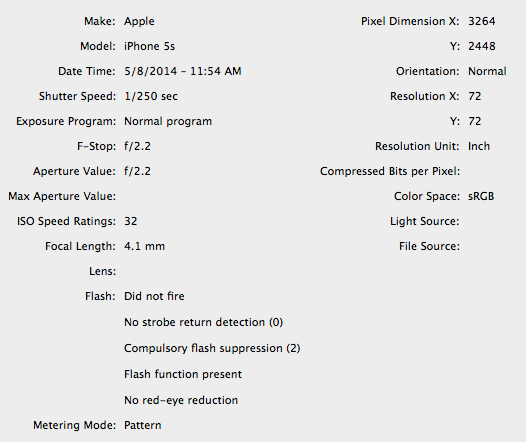
Every photo contains at least some metadata. What it is and how much depends on how the file was created and if someone added metadata. For example… when you take a photo with your phone, chances are it logs your latitudinal and longitudinal location, phone type, if the flash went off, and more.
Metadata is Useful
Now, metadata is extremely useful for photographers, and companies for all kinds of reasons! It helps them know when certain licensed content expires, who took a certain photo, when and where it was taken, what settings the camera used to take the photo, and much more. However, there can be times when you don’t want all that data, especially location information, going public.
Oh, Crap...
You may be a bit worried now… How much data have you posted online because you didn’t know it was contained within the metadata of your files? That’s a valid concern. I’ve taken a look at the top social networks and image posting sites to see how they handle metadata publicly.
Facebook stripped all uploaded images of all metadata prior to them being posted. Now, whether they keep that data to themselves for monetization in some way, who knows. I speculate they probably do keep it internally.
Twitter stripped all uploaded images of all metadata prior to them being posted.
Instagram stripped all uploaded images of all metadata prior to them being posted.
Flickr
Flickr didn’t strip any metadata from uploaded images prior to them being posted.
Imgur
Imgur stripped all uploaded images of all metadata prior to them being posted.
Tumblr
Tumblr didn’t strip any metadata from uploaded images prior to them being posted.
All Findings
Lucky for us, most of the tested sites strip the data, except Tumblr and Flickr.
This chart shows all the sites I’ve tested in a single table.
| Stripped Metadata? | |||||
|---|---|---|---|---|---|
| Flickr | Imgur | Tumblr | |||
| ✓ | ✓ | ✓ | X | ✓ | X |
Checking Your Metadata
Curious what metadata is associated with your online or even offline images? This free tool⇗ reads it all for you. Or, take it a step further with this tool⇗, which also helps remove exif metadata.
Removing Metadata Before Posting
If you post your images to your own site, and aren't using a Content Management System (CMS) you could very well be putting out a lot of info with each picture. In order to avoid this, you’ll want to strip the metadata from your images before you post them. I'd recommend checking images even if they are posted through a CMS!
Metadata can be removed, or even edited, in many different ways. If you have Photoshop you can open an image and choose to view the file info from the File drop down. Many other image editing programs probably have similar functionality. But what if you don’t have Photoshop?
You don’t need those expensive programs to remove metadata - there are free options, too.
ImageMagick
My preferred method is using the Terminal on the Mac to strip all metadata from an image. This is easily done after installing a little program called ImageMagick.
This method requires a little familiarity of navigating your filesystem within Terminal with ‘cd’ and ‘ls’. Here’s how it works:
1. Install Homebrew. Do you need to know what that is? Nope. Just follow these steps. But if you’re curious, it’s a package manager for Mac. Open the Terminal on your Mac and paste:
ruby -e "$(curl -fsSL https://raw.github.com/Homebrew/homebrew/go/install)"The process will ask you a few questions and proceed to install Homebrew.
2. Install ImageMagick. Once that’s done installing, type or paste:
brew install ImageMagick3. Ready to strip. Now you can begin stripping metadata from images. To do so, use the Terminal to navigate to the folder that contains your image. Alternatively, you can go to your image in Finder and drag it into the Terminal. This will automatically populate the filepath to your image. Just follow this format:
convert imageName.jpg -strip newImageName.jpgSo what you’re doing here is telling ImageMagick to take the original image, titled ‘imageName.jpg’ and strip the metadata and then save the resulting file as ‘newImageName.jpg’ in the same folder.
Other Free Options
- (Mac/Windows) Image MetaData Stripper v1.0 GNU/GPL⇗
- (Mac) ImageOptim⇗
Comment and Connect
Did you find this article useful? Feel free to shoot me a message on Twitter, @flyinthecoop.